Oracle will be featuring one of our customers from BI Consulting Group in a Customer Reference Forum next Wednesday, March 4th.
Discussion is set to surround the details involved with the implementation of Financial Analytics, specifically Payables, Receivables, and Profitability Analytics. The source systems accessed included Oracle eBusiness Suite (EBS) as well as some third-party data sources.
Click to the evite for more or contact your Oracle Rep to get registered (I think this is only necessary if you want to field questions during the discussion period),
Link to Session Evite
Toll Free Number (USA/Canada): +1 800 439 4935
International Toll Number: +1 706-634-9081
Conference ID: 86414290
OracleBIBlog Search
Saturday, February 28, 2009
Oracle Customer Forum featuring Transaction Network Services (TNS)
Thursday, February 5, 2009
SQL: Just the Basics
What is SQL?
SQL used be "SEQUEL" and stood for 'Structured English Query Language', but it was changed to SQL and now stands for 'Structured Query Language.' Supposedly, the change was due to a trademark infringement with another company.
SQL is what users like you and I use to access and manipulate databases.
SQL can....
- execute queries against a database
- retrieve data from a database
- insert records in a database
- update records in a database
- delete records in a database
- create new databases
- create new tables in a database
- create stored procedures in a database
- create views in a database
- etc.
SQL is just a general term used to describe the language used to interact with databases.
There are in fact several variations of SQL that are widely used; such as,
SQL/PSM -- SQL/Persistent Stored Modules (ANSI/ISO Standard)
PSQL -- Procedural SQL (Interbase/Firebird)
SQL PL -- SQL Procedural Language (IBM)
T-SQL -- Transact SQL (Microsoft/Sybase)
SQL/PSM - SQL/Persistent Stored Module (MySQL)
PL/SQL -- Procedural Language/SQL (Oracle)
PL/pgSQL -- Procedural Language/PostgreSQL Structured Query Language (PostgreSQL)
PL/PSM -- Procedural Language/Persistent Stored Modules (PostgreSQL)
I won't go into detail because that is for a later date and a different post.
As the title states, this is just the basics of SQL.
Before we get started, let me explain that I will only be covering the DML part of SQL. To refresh your memory, DML stands for Data Manipulation Language. We'll probably go over the DDL (Data Definition Language) part later.
So, let's get started!
Below are two tables: Employee table and Salary table.
These tables will be used in each exercise to demonstrate how each SQL command works.
In nearly every query, the commands SELECT and FROM will always be used. Why? Because in order to retrieve data from databases, we need to SELECT what it is that we want to see and need to specify FROM which table(s) to retrieve the data.
SELECT
This statement is used to select data from a database.
The syntax for SELECT is:
SELECT table_name.column_name(s)
FROM table_name;
| **NOTE: 1. SQL is not case sensitive, but it is good practice to keep all caps for easy readability. 2. 'FROM' does not have to be on a separate line; however, keeping it on a separate line is considered best practice due easy readability. 3. Placing the name of the table with the column name is best practice because future queries will require joining tables and tables may have the same column name and the only way the query can distinguish between columns with similar names is by indicating what tables the columns belong to. |
An example:
From the Employee table, select the last name, first name, and occupation columns.
SELECT Employee.Lastname, Employee.Firstname, Employee.Occupation
FROM Employee;
SELECT DISTINCT
This statement is used when selecting only distinct, meaning non-repetitive, unique, data from a table.
The syntax for SELECT DISTINCT is:
SELECT DISTINCT table_name.column_name(s)
FROM table_name
An example of SELECT DISTINCT:
From the Employee table, select distinct values from the Location’s column.
SELECT DISTINCT Employee.Location
FROM Employee;

WHERE
This clause is used to select records that meet a specific condition(s).
The syntax for WHERE is:
SELECT table_name.column_name(s)
FROM table_name
WHERE table_name.column_name 'operator value';
| Examples of operator values:
|
An example of WHERE:
From the Employee table column, select all of the columns where the Location column is equal to Minneapolis.
SELECT *
FROM Employee
WHERE Employee.Location = ‘Minneapolis’;
| **NOTE: When the condition references a text value, then you must enclose the condition with single quotes; however, numerical values do not require single quotes. |
AND & OR
These operators are used when there are more than 1 condition in the query. They can be used separately or together.
The syntax for each one is:
SELECT table_name.column_name(s)
FROM table_name
WHERE table_name.column_name 'operator value' AND table_name.column_name 'operator value';
(This query means that BOTH conditions must be met in order for the select value(s) to appear in the result-set. If one condition is not met, then no value(s) will appear in the result-set.)
SELECT table_name.column_name(s)
FROM table_name
WHERE table_name.column_name 'operator value' OR table_name.column_name 'operator value';
(This query will return value(s) provided that either one of the two conditions are met. For instance, if the condition is column_name = 'red' OR column_name = 'blue' and only the first condition can be met, then the result-set will show the rows that meet the first condition.)
SELECT column_name(s)
FROM table_name
WHERE table_name.column_name 'operator value' AND (table_name.column_name 'operator value' OR table_name.column_name 'operator value');
(This query combines both AND & OR resulting in a result-set that must still meet both conditions, but with the second condition containing a separate condition that does or does not have to meet the conditions.)
An example of AND & OR:
From the Employee table, select all columns that meet the following conditions: Location equals Minneapolis and Firstname equals Jane or Bob.
SELECT *
FROM Employee
WHERE Employee.Location = ‘Minneapolis’ AND (Employee.FirstName = ‘Jane’ OR Employee.FirstName = ‘Bob’);
IN & BETWEEN
The IN operator works when there are several conditions. It works the same way as the OR operator, but makes the SQL look more legible and intelligible.
The BETWEEN operator is used when selecting a range of data that is between two values.
The syntax for IN and BETWEEN:
SELECT table_name.column_name(s)
FROM table_name
WHERE table_name.column_name IN ('value', value, 'value', etc);
| NOTE: The conditional portion of the query could also be written using OR, but would make the query look long: WHERE tale_name. column_name = 'value' OR table_name.column_name = value OR table_name.column_name ='value' etc. Using IN requires less typing and makes the query look more clean and intelligible. |
SELECT table_name.column_name(s)
FROM table_name
WHERE table_name.column_name BETWEEN value AND value;
| NOTE: The conditional portion of the query can also be rewritten using AND; for example, WHERE table_name.column_name >= value AND table_name.column_name <= value, where 'value' is a numerical value. |
An example of IN and BETWEEN:
From the Employee table, select all employees with the LastName equal to Alba, Bower or Davis.
SELECT *
FROM Employee
WHERE Employee.LastName IN (‘Alba’, ‘Bower’, ‘Davis’);
From the Employee table, select all employees whose Location is between Minneapolis and Minneapolis.
SELECT *
FROM Employee
WHERE Employee.Location BETWEEN ‘Minneapolis’ AND ‘Minneapolis’;
Note: Depending on the database that you are using, the BETWEEN function will work different. It may include or exclude the test values. |
ORDER BY ... ASC/DESC
This command is used to sort the result-set in ascending or descending order on a specific column. Keep in mind that to sort in ascending order, one can either use 'ORDER BY ... ASC' or just 'ORDER BY', because 'ORDER BY' defaults to ascending order anyways.
The syntax for ORDER BY:
SELECT table_name.column_name(s)
FROM table_name
ORDER BY table_name.column_name(s) ASC / DESC;
An example of ORDER BY:
Select all the employees and rank them by Location in ascending order.
SELECT *
FROM Employee
ORDER BY Employee.Location ASC;

AGGREGATION FUNCTIONS
Aggregation functions are used to calculate numerical values in a specified column.
Below are 6 commonly used aggregate functions:
| MIN () - returns the smallest value
|
The syntax for the aggregate functions:
SELECT AVG(table_name.column_name)
FROM table_name
WHERE table_name.column_name 'operator value';
SELECT COUNT(table_name.column_name)
FROM table_name;
SELECT COUNT(*)
FROM table_name;
(**This will return the number of rows for the selected table**)
An example of an Aggregate Function:
SELECT AVG(Salary.Salary)
FROM Salary;

| Note: In the result-set, the name of the column is AVG(Salary.Salary). To give the column name a more appropriate title, you can give the column name an alias. For instance, SELECT AVG(Salary.Salary) AS Avg. Salary. The column header will now appear as Avg. Salary. |
GROUP BY
This statement is used to group the result-set by one of more columns and is used in conjunction with the aggregate functions mentioned above.
The syntax for GROUP BY:
SELECT table_name.column_name(s), aggregate_function(table_name.column_name)
FROM table_name
GROUP BY table_name.column_name(s);
An example of GROUP BY:
Create a list of the total salaries of employees and group them by occupation.
SELECT Salary.Occupation,SUM(Salary.Salary) as Total_Salary
FROM Salary
GROUP BY Occupation;
HAVING
This clause is used in conjunction with ORDER BY and places a condition on the column(s) in the GROUP BY clause. Also, this clause is used with ORDER BY because WHERE cannot be used with aggregate functions.
The syntax for HAVING:
SELECT table_name.column_name(s), aggregate_function(table_name.column_name)
FROM table_name
GROUP BY table_name.column_name(s)
HAVING aggregate_function(table_name.column_name) operator value;
An example of HAVING:
Find the occupations that have a total salary less than 200000.
SELECT Salary.Occupation, SUM(Salary.Salary)
FROM Salary
GROUP BY Salary.Occupation
HAVING SUM(Salary.Salary) <>
What I've shared with you now is just the tip of the SQL iceberg.
Continue to check back on this blog post as I will continue to update it with additions and edits.
Tuesday, February 3, 2009
OBIEE Security Enforcement – LDAP Authentication
Authentication in OBIEE
Some authentication methods used by Oracle BI server are
1. Database
2. LDAP
3. Oracle BI server (repository users) – I do not recommend this method for medium to large implementations. It will be difficult to manage.
I will discuss on setting up LDAP in this article.
Setting up LDAP or Windows ADSI in OBIEE
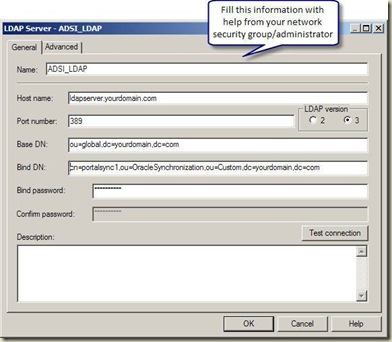
Microsoft ADSI (Active Directory Service Interface) is Microsoft version of LDAP server. Most of the steps to setup of either Microsoft ADSI or LDAP server are similar. In either case, you would need help from your network security group/admin to configure LDAP. They should provide you with the following information regarding the LDAP server
1. LDAP server host name
2. LDAP Server port number
3. Base DN
4. Bind DN
5. Bind Password
6. LDAP version
7. Domain identifier, if any
8. User name attribute type (in most cases this is default)
Registering an LDAP server in OBIEE
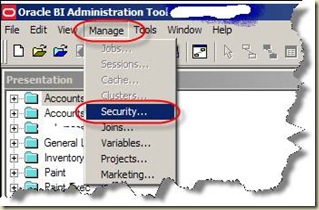
In Oracle BI repository, go to manage security.
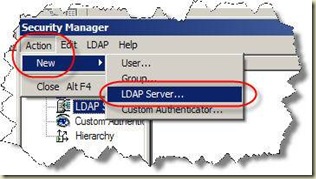
Create a new LDAP server in OBIEE Security Manager
With the help from your network security group/administration, fill out the following information
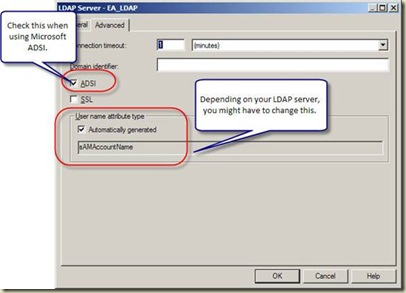
Next in the Advanced tab, based on the kind of LDAP server you have and its configuration, make the necessary changes.
For Microsoft ADSI (Active Directory Service Interface), choose ADSI and for all others leave it unchecked.
Most of the times, Username attribute would be automatically generated. For Microsoft ADSI It is sAMAccountName; for most of the LDAP servers it is uid or cn. Check with your network security group/administrator on what is the username attribute for your LDAP server. Make a note of the user name attribute you will need it later.
Now we need to create an Authentication initialization block. In administration tool, under Manage go to Variables.
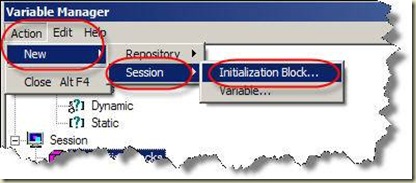
Under Action, go to New -> Session -> Initialization Block
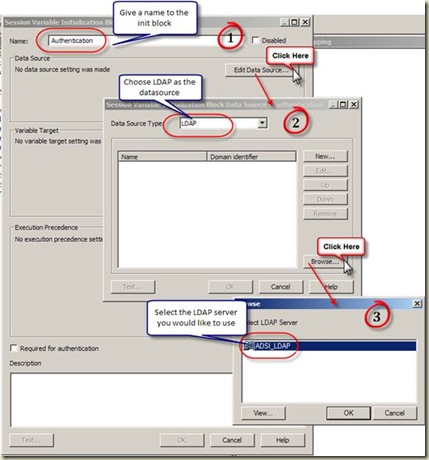
Configure the session initialization block. Give it a name and click on Edit Data Source. In the pop up window, choose LDAP from the drop down box and then click on Browse. You can also configure a LDAP server here by clicking on “New”. In the browse pop up window choose the LDAP server you would like to use.
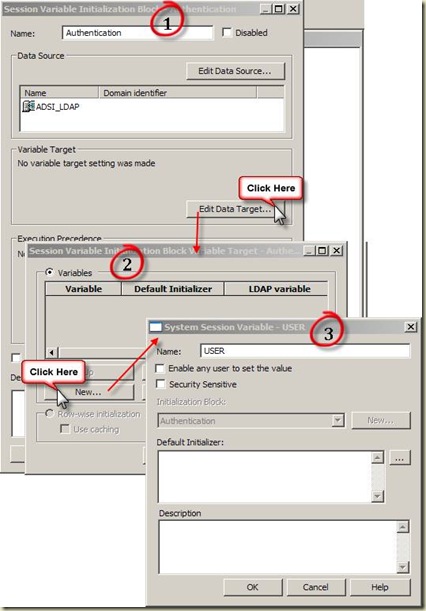
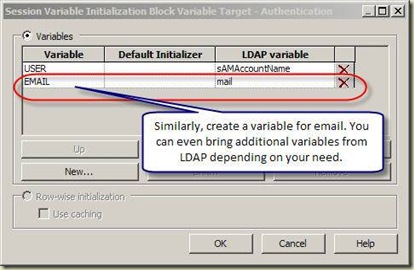
Next we need to create variables. User and Email are the common variables normally in play.
Upon clicking on OK, a warning pops up on the usage of User session variable (User session variable has a special purpose. Are you sure you want to use this name). Click yes.
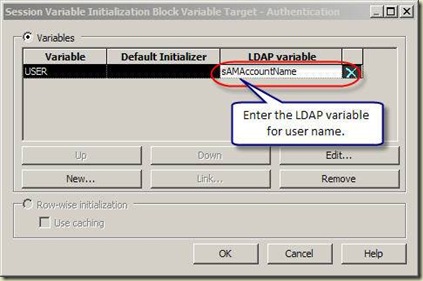
Next enter the LDAP variable for username. sAMAccountName in the case of ADSI as configured in the LDAP.
Next following similar steps create a variable for Email. In addition, depending on you need, you can bring additional variables from the LDAP server.
Now bounce your services.


